Copyright
1986, 2002 by Bruce Jaeger. All rights reserved.
This worked for me. It may not work for you. You may make a mess of things and wreck your computer. The risk is all yours.
Be aware that this procedure involves opening up your computer, and may void your warranty. However, it usually takes a while to for the keyboard to get dirty enough to cause problems--and by that time the warranty is usually long expired anyway. (Yeah-about 15 or 16 years ago! BCJ 2002)
My own much-abused Commodore 64 needed quite a rap with the index finger to get the RETURN key to register. The cursor-control keys just beneath the RETURN key were also a little tough to work with, so it looked like the problem was mostly in that area. (I have to admit that plenty of drinks have been spilled near my machine, and an occasional cigar ash has dropped between the keys.)
To save you the necessity of repeating my mistakes, here's what NOT to do: Reasoning that the contacts (whatever kind they were) under the RETURN key were dirty, I thought I'd pop up the RETURN keycap and spray some contact cleaner in it. By gentle prying with a small screwdriver, the RETURN keycap popped off all right--about six feet in the air! The spring that was under the keycap made it about twenty feet before it rolled to a stop.
I then sprayed some electronic contact cleaner into the plastic column that holds the RETURN keys post, put the cap back on and turned on the computer. Disaster! Now the RETURN key didn't work at all!
Here's the real way I found to clean the Commodore 64's keyboard:
- Unplug the 64, remove all cables, and set it upside down on a clean, flat workspace.
- Using a phillips screwdriver, remove the three screws holding the two halves of the 64 together.
- Turn the 64 rightside up again (watching that it doesn't fall apart where you removed the screws) and carefully open up the 64 from the side where the three screws were taken out. Plastic fingers on the side away from the three screws act somewhat like a hinge--be careful not to force things and break these fingers!

- Pull off the top of the 64, and set it aside.
- There is a wire running from the LED in the top of the 64 to a plastic connector that connects the wires to the circuit board. As this wire is in the way, we’ll want to temporarily remove it. Make a note of which way the connector is attached (so you don't get it turned around on re-assembly) and pull the connector away from the circuit board.
- The connector holding the keyboard wires to the Commodore 64's main circuit board can also (carefully!) be removed. Note how there is a "gap" in the metal fingers and a corresponding missing hole on the connector. This keeps the connector from being replaced with the wires in the wrong direction.
- Now the top of the Commodore 64 is entirely separate from the bottom, and we can set aside the base of the 64, leaving just the keyboard half. Turn the keyboard over so that the keys are on the table.
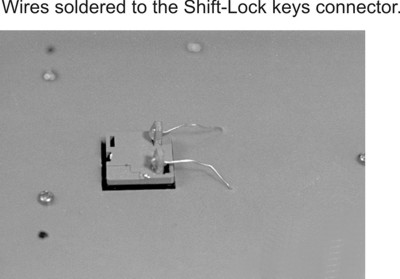
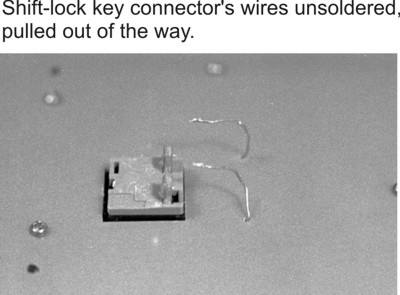
- Note the wires soldered to the SHIFT-LOCK key connector. Carefully unsolder both wires and pull them slightly away from the connector.
- Remove the 23 tiny screws holding the PC (printed circuit) board to the keyboard assembly. While a small phillips screwdriver will work, removing these screws is easier with a swivel-head jewelers screwdriver.
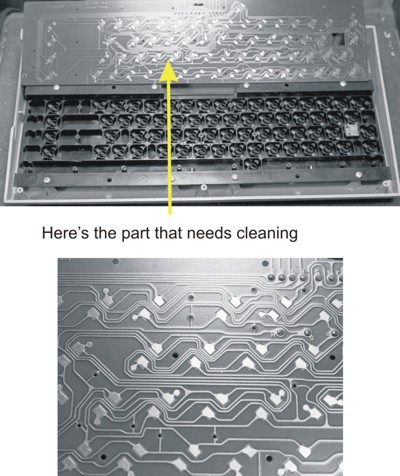
- Carefully remove the PC board, and turn it over. The exposed copper contact pads you see were filthy on my Commodore 64 near the RETURN key area. Clean all the pads with contact cleaner. To make extra sure things were clean, I used a soft pencil eraser (NOT an ink eraser) to brighten up the pads before cleaning with the solvent. Remember that you want to clean the copper pads, not scratch them up!
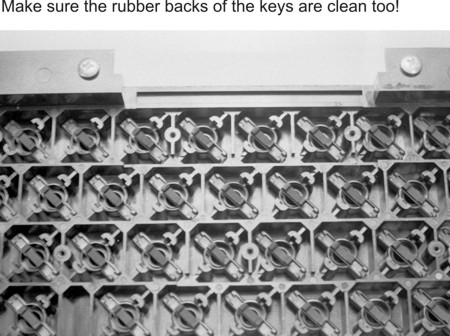
- Now look at the bottom of the keycaps. The protruding rubber-like "fingers," when pressed against the contacts we just cleaned, pass enough current for the electronics of the 64 to know a key has been pressed. Make sure there is no dust or junk around the rubber contacts; I also gave mine a good spray of the electronic contact cleaner (which leaves no residue) to further make sure they were clean.
- That's all! now put everything back together, in the reverse order we took things apart:
- Screw the PC board back on. (Don't cheat--use all the screws! Its important for proper operation.)
- Solder the two wires back onto the SHIFT-LOCK key connector.
- Re-connect the keyboard wire connector to the Commodore 64 circuit board.
- Re-connect the LED wires to the main circuit board.
- Place the top and bottom halves of the Commodore 64 case together. Make sure that the plastic "fingers" at the back of the case are engaged properly.
- Replace the three screws that hold the cases together.
- Plug in all the cables, and test. My Commodore 64 worked as well as the day I bought it!
End